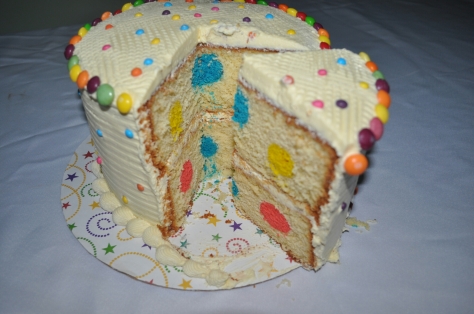
Imagine the surprise when you cut into the cake to reveal the patterned interior. This polker dot cake or any patterned cake is actually easier than you thought.
Though most cake makers prefer a slightly denser cake for patterned cake for this technique, with experience, you will be able to work with your regular cake recipe.
For this tutorial, we will be working with a simple Madeira cake
You will use a cake pop maker for the polker dot cake. You can use the cake pop pan or an electric cake maker. I used the electric cake pop maker.
Recipes:
Butter 350g
Sugar 350g
Flour 500g
Baking powder 4tsp
Eggs 7
Sift flour and baking powder in a dry bowl. Add lemon zest, combine and set aside
In your mixer, cream butter and sugar until fluffy, add eggs 1 at a time and continue creaming just until well combined.
Fold in the flour until combined.
Take out several batches of the batter and colour with food colour. Bake the polker dots in the cake pop pan and cool. This can be made ahead of time and allowed to cool before mixing the main cake
Remove the cake pops, trim the edges if rough to get the pops round.
Place a small amount of batter in your pan and place the cake pops on the batter. Pour more batter on the pops to completely cover them. I use a pastry bag to get even distribution of the batter without shifting the pops.
You will have to make layers of the cakes so that the pops are centered in each layer. Make as many layer as you want but a typical layer will be about 1.5 to 2 inches high.
Again target to just cover the pops lightly as the batter will rise when heated, distributing evenly to cover the pops completely.


